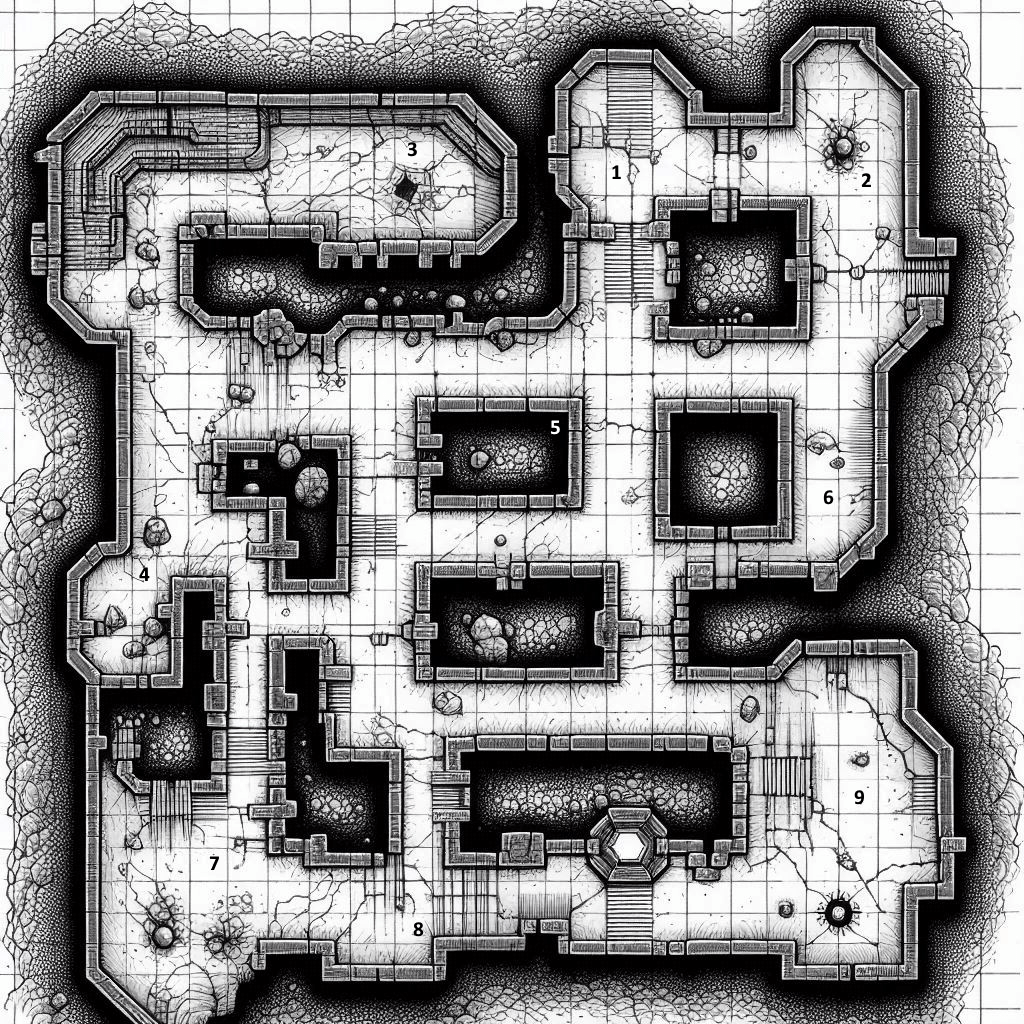
Overview: The adventurers discover a long-forgotten sanctum buried beneath the ruins of an ancient castle. The air is musty, filled with the scent of decay and dust. The walls, though cracked and crumbling in places, still bear faint traces of intricate carvings depicting scenes of old rituals and battles.
Room Descriptions:
- Entryway (Top-Right):
The first room the party encounters upon descending into the dungeon is a grand entryway. Dust-covered, but the remnants of an ornate door can still be seen hanging off its hinges. Cobwebs hang thick in the corners, and a pair of rusted sconces are mounted on the walls. The atmosphere is eerily silent except for the occasional drip of water echoing from deeper within the sanctum. - Guardian’s Hall (Top-Right, next to Entryway):
This chamber was once a guard post. Broken weapon racks and shattered shields litter the floor. A pair of skeletal remains, still clad in rusted armor, lay slumped against the walls. A successful Investigation check (DC 12) reveals a hidden compartment in one of the walls containing a small stash of coins (15 gp, 30 sp) and a potion of healing. - Collapsed Room (Top-Left):
This room has partially collapsed, with rubble and debris covering the floor. A large hole in the ceiling provides a glimpse of the sky above. Among the rubble, the party might find a buried chest containing a spell scroll (detect magic) and a silver ring worth 25 gp. The unstable ceiling poses a danger, and a failed Dexterity saving throw (DC 10) results in minor falling debris damage (1d6 bludgeoning). - Prison Cells (Middle-Left):
Rows of iron-barred cells line the walls, each containing the skeletal remains of prisoners long forgotten. One cell is slightly ajar and contains a skeleton clutching a worn leather journal. The journal details the last days of a prisoner and hints at a hidden escape route (leading to Room 8) that was never completed. - Storage Room (Middle-Center):
This room was used for storing supplies. Broken crates and barrels are scattered across the floor, their contents long since rotted away. However, a successful Perception check (DC 15) reveals a hidden stash beneath the floorboards containing an old map showing the layout of the sanctum and marking a secret room (Room 9). - Altar Room (Middle-Right):
At the far end of this room stands a raised stone altar, covered in dust and cobwebs. The walls are adorned with faded tapestries depicting ancient religious ceremonies. An arcana check (DC 15) reveals faint magical traces around the altar, indicating that it was once used for powerful rituals. A secret compartment in the altar holds a holy symbol of an ancient deity and a potion of greater healing. - Abandoned Barracks (Bottom-Left):
Rows of decaying bunk beds and broken furniture fill this room. It once housed the sanctum’s guards or acolytes. A thorough search reveals a hidden drawer beneath one of the beds containing a small cache of gems (3 x 50 gp) and a rusted key that fits a locked door in Room 9. - Secret Tunnel (Bottom-Middle):
This narrow passage was a hidden escape route. It is mostly collapsed, but a small crawlspace remains navigable. It leads to Room 7 and provides an alternative route to bypass some of the dangers of the sanctum. Crawling through the tunnel requires a successful Athletics check (DC 10) to avoid getting stuck or injured. - Central Chamber (Bottom-Right):
The largest room in the sanctum, this chamber was used for grand ceremonies. A hexagonal platform in the center is inscribed with arcane runes that glow faintly when approached. A locked door (opened with the key from Room 7) leads to a treasure room containing an ancient artifact: a staff of healing. The room also contains a pedestal with a riddle inscribed on it. Solving the riddle opens a hidden compartment containing 150 gp, a +1 longsword, and a mysterious amulet.
Adventure Hooks:
- Artifact Retrieval: The party is tasked with retrieving the staff of healing for a powerful cleric or noble.
- Cleansing the Sanctum: A local village believes the sanctum is cursed and asks the adventurers to cleanse it of any lingering evil.
- Mystery of the Amulet: The amulet found in Room 9 bears strange markings that hint at a larger mystery, leading the party on a quest to uncover its origins and purpose.
This is a general map that can be dropped into any D&D adventure. Use the setting as you’d like and pop in your favorite monsters to give your players a serious challenge.


Leave a comment